How I Make My Sculptures
In the beginning…there was a ball of aluminum foil.


Each of my sculptures begins the same way. No matter the size or shape of what I am sculpting, I always start by making a foil armature. An “armature” is the internal framework around which the sculpture is built. In this case, I scrunch up aluminum foil into the desired shape, which is usually a sphere for a head or a cylinder for a limb.
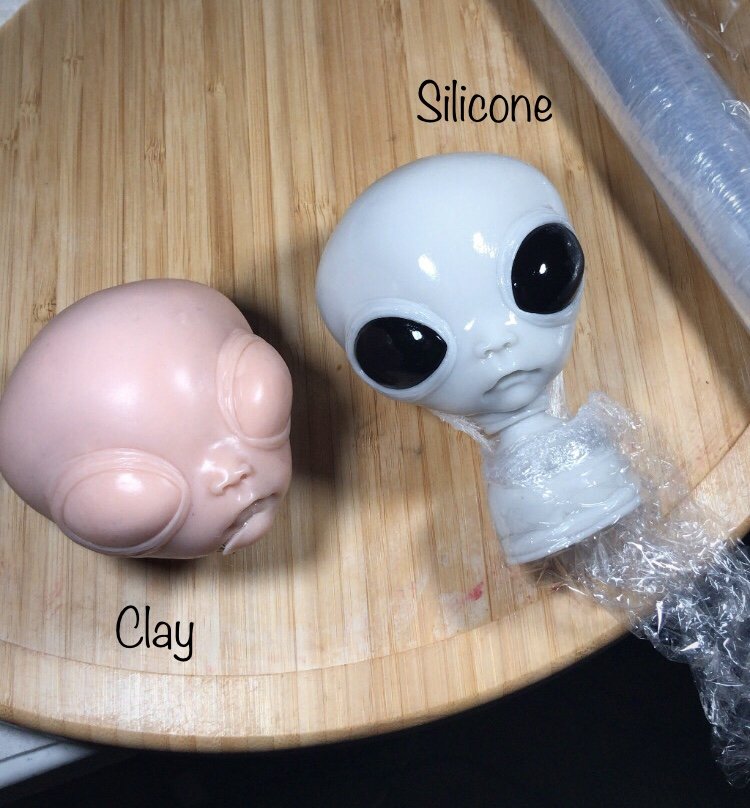
After the armature is made, I begin adding the clay. I use a product called “Sculpey”, which is a type of Polymer Clay. I apply the clay in layers, one piece at a time, to achieve the basic shape of the sculpture. Smoothing the clay as I go, and using my tools occasionally to form the clay into the shape I need. Later on, I begin my favorite part: Details. I adore the details, I get immersed in them. Creases, wrinkles, nails, eyelids, and so many more features that enliven the sculpture. I use a combination of metal and silicone-tipped tools to sculpt the small details.
After many hours of carefully smoothing and gently caressing the clay with my tools and fingers, I finally finish sculpting. At this stage, I place my sculpture into a small convection oven to bake, or cure, the clay. The clay has been soft and malleable until this point, where it will now harden with the heat. I bake the sculpture at 275 degrees Fahrenheit for a varied amount of time, depending on the thickness of the clay. Usually 3 baking sessions, each around 10 minutes. I allow the sculpture to cool between bakes, and I rotate it for each bake so that all angles have access to the heat.


After a successful bake in the oven, the next stage can begin: Sanding. It’s not my favorite part of the process, but it’s a step I’ll never skip. I prefer my sculptures to be so smooth that they are nearly polished. I use a combination of various grits of wet-dry sand paper, ranging from 400-1200 grit. Once this tedious task is done, it is finally time to move on to the next stage: Molding.


I make what is called a “Glove Mold” from my sculptures, which is essentially a painted-on mold. I use a strong and flexible silicone product, which comes in a liquid form. I paint/apply many layers of this molding silicone onto my sculpture, until its the desired thickness. Thick enough to last several casts, and not thin enough to tear in any places. The second step of making a mold, is applying the “Mother Mold”, which is a lightweight putty-like substance that cures to be rock hard. This outer mold acts like a shell, which keeps the inner silicone mold in place. Its acts as an all-encompassing support for the silicone mold while casting. Once all parts of the mold have been completed, I then remove the clay sculpture from inside. It’s often a sad sight to see, as the sculpture usually crumbles as it’s being removed from the glove mold. But it’s all part of the process, and it’s all worth it in the end.


The next stage is quite exciting: Casting. After the glove mold is empty and clean, its time to add the mold-release agent. It’s a waxy substance that coats the inner lining of the glove mold, acting as a barrier between the mold and soft silicone that is poured into it. I cast my molds with a soft and flexible silicone product called “Eco-Flex Platinum Silicone”. The mixture I use results in cuddly and lifelike dolls. At this point, I suppose my creations graduate from the term “sculpture” and become “dolls”.
Once the soft silicone has cured, I carefully remove the doll from the mold. The doll comes out coated in the release agent, and requires a thorough cleaning before beginning the next stage: Repairing and Painting.
Sometimes, the dolls come out of the mold with tiny bubble or little rips in the delicate areas, like between fingers or under the knee/elbows. These repairs are made by filling in the damaged areas with the same silicone mixture, ensuring a seamless fix.
Now, painting can begin. Painting silicone is one of my favorite stages of this entire journey, as it is a very detailed and precise process. I use a thin paint mixture consisting of pure silicone pigments, a clear silicone paint-base, and simple paint thinner to design my palate. I love mixing my own colors, so that each doll I paint is unique to the next. I use various brushes and sponges to apply the paints, and cure them gently with a handheld heating device. While I’m painting, I always have a set of tweezers nearby to pick off any fluff that sticks to the silicone. Silicone is prone to static-electricity, and will attract tiny debris to it’s surface. I take pride in my tweezing, I try to make my dolls as fluff-free as possible!


After the painting is finished, I add a clear coat of silicone over the entire doll to seal the paint underneath. Silicone is very shiny, so the last and absolutely essential step is called: Matting. This involves applying a special “Matte Powder” to a sticky coating of silicone after the doll has been sealed. This powder sticks to that last coat, and leaves the doll silky smooth. The doll feels so soft after this final step, just like a real baby.


There you have it! Aside from some additional details that vary from doll to doll (inserting eyes, rooting mohair, etc), you know have a full summary of how my sculptures (dolls) are made! If you would like to dive even deeper into understanding my process, please click the link below to read my “Creating Channeled Artwork” article. This is a multi-layered experience for me, extending into higher realms of consciousness and awareness.
Thank you so much for your interest in my work and for supporting my passion! It fills me with an endless supply of enthusiasm!
With gratitude,
~Willow